Ergonomic Code with Elysia #2: Connect database with Drizzle ORM
Practical way to implement creating, managing, connecting, using database with Elysia.


Database is essential for storing data from API. And to avoid cumbersome operations with traditional raw SQL commands, we can use ORM. There are many popular ORMs, in the scope of this article, I will introduce you to Drizzle ORM.
Simply put, Drizzle ORM will bring you convenience, instead of writing a SQL sentence like this:
SELECT * FROM public.postsyou can write it directly in Typescript (for type safety) like this:
const result = await db.query.posts.findMany()
// db.query.posts and result are fully type-safe in typescriptCreate local Postgres with Docker
Postgresql is extremely popular so I won't introduce it again, the same goes for Docker. If you don't have Docker yet, you can install it here.
Then create the following docker-compose.yml file and run docker compose up -d to initialize a new postgres container.
volumes:
  postgres-data:
    name: postgres-data

services:
  postgres:
    image: "postgres:17.5"
    restart: unless-stopped
    container_name: postgres
    ports:
      - "5432:5432"
    environment:
      POSTGRES_USER: "postgres"
      POSTGRES_PASSWORD: "abc12345"
      POSTGRES_DB: "postgres"
    volumes:
      - postgres-data:/var/lib/postgresql/data
Here, for convenience, I will fill in environment variables like POSTGRES_USER, POSTGRES_PASSWORD into the file. However, in reality, everyone should keep it in a separate env file and not put it on version control.
You can now use any DBMS to access the DB via the URI: postgresql://postgres:abc12345@localhost:5432/postgres
Create environment variables and connect Elysia with DB
We will create a .env file to contain the application's configs, which will be different depending on our future deployment environment. You will want to put this .env file in .gitignore to bypass version control
NODE_ENV="development"
PORT="4000"
DATABASE_URL="postgresql://postgres:abc12345@localhost:5432/postgres"In the Elysia application, install the necessary packages for Drizzle
bun add drizzle-orm drizzle-typebox pg @paralleldrive/cuid2bun add -D drizzle-kit @types/pgIf you encounter a version mismatch in drizzle-typebox please refer to the original documentation for installation.
To be able to store the Post created from the API in the previous post, we will create a schema for it. I will create this file in src/db/schema/app.ts
import { createId } from "@paralleldrive/cuid2";
import { integer, pgSchema, text } from "drizzle-orm/pg-core";

// Application Schema
export const appSchema = pgSchema("app");

export const posts = appSchema.table("posts", {
  id: text("id")
    .$defaultFn(() => createId())
    .primaryKey(),
  title: text("title").notNull(),
  content: text("content"),

  incrementId: integer("increment_id").generatedAlwaysAsIdentity(),
});
@paralleldrive/cuid2 to do this. At the same time, I still save the auto-increment code in the field increment_idThen you need to export the schema and type of the schema you just created so that drizzle-kit can use it (I will explain more about how to use drizzle-kit below). We will create this export file at src/db/schema/index.ts
export * from "./app";

import { posts } from "./app";

export const table = {
  posts,
} as const;

export type Table = typeof table;
The next step is to create a Drizzle instance to use in the application, I will create it in src/db/index.ts
import { drizzle } from "drizzle-orm/node-postgres";
import { Pool } from "pg";
import * as schema from "./schema";

// Create a PostgreSQL connection pool
const pool = new Pool({
  connectionString: process.env.DATABASE_URL,
});

// Create a Drizzle database instance
export const db = drizzle(pool, { schema });
Update Post service
Now we will edit the Post service created in the previous article, using the database to store data.
import { db } from "@/db";
import { postModel } from "./model";
import { table } from "@/db/schema";
import { eq } from "drizzle-orm";

export abstract class PostService {
  static async getPosts() {
    return await db.query.posts.findMany();
  }

  static async getPostById(id: string) {
    const post = await db.query.posts.findFirst({
      where: eq(table.posts.id, id),
    });
    if (!post) {
      throw new Error("Post not found");
    }
    return post;
  }

  static async createPost({ data }: { data: typeof postModel.body.static }) {
    const posts = await db
      .insert(table.posts)
      .values({
        title: data.title,
        content: data.content,
      })
      .returning();
    return posts[0];
  }

  static async updatePost(
    id: string,
    {
      data,
    }: {
      data: typeof postModel.body.static;
    }
  ) {
    const post = await db.query.posts.findFirst({
      where: eq(table.posts.id, id),
    });
    if (!post) {
      throw new Error("Post not found");
    }
    const posts = await db
      .update(table.posts)
      .set({
        title: data.title,
        content: data.content,
      })
      .where(eq(table.posts.id, id))
      .returning();
    return posts[0];
  }

  static async deletePost(id: string) {
    const post = await db.query.posts.findFirst({
      where: eq(table.posts.id, id),
    });
    if (!post) {
      throw new Error("Post not found");
    }
    await db.delete(table.posts).where(eq(table.posts.id, id));
    return post;
  }
}
Okay, now we'll try to create a new post and... failed!
curl http://localhost:4000/post/ \
  --request POST \
  --header 'Content-Type: application/json' \
  --data '{
  "title": "test",
  "content": "test"
}'

Failed query: insert into "app"."posts" ("id", "title", "content", "increment_id") values ($1, $2, $3, default) returning "id", "title", "content", "increment_id"
params: ymhsqaf8rof7wbmgdtcmo8qq,test,test
But don't worry, this is because although we have created the schema for Drizzle to understand the data structure. However, the actual structure on the database has not been created yet.
Code-first with Drizzle-kit
There are usually two ways to create or update a database structure: database first and codebase first (or code-first). Each method has its own advantages and disadvantages, Drizzle supports both methods, you can read more here.
In the scope of this article, I will use option 2 mentioned in the link above to perform migration for quick convenience. If you work with a large codebase, complex project, I recommend you use options 3 or higher to be able to store database schema according to migration versions.
First we need to add the drizzle.config.ts file to the root directory of the project, this is the config file needed for drizzle-kit to work
import type { Config } from "drizzle-kit";

export default {
  schema: "./src/db/schema",
  out: "./drizzle",
  dialect: "postgresql",
  schemaFilter: ["app"],
  dbCredentials: {
    url: process.env.DATABASE_URL!,
  },
} satisfies Config;
Now run bun drizzle-kit push you will notice that the changes have been applied
$ drizzle-kit push
No config path provided, using default 'drizzle.config.ts'
Reading config file '/home/hoaaq/personal-code/ergonomic-code-with-elysia/drizzle.config.ts'
Using 'pg' driver for database querying
[✓] Pulling schema from database...
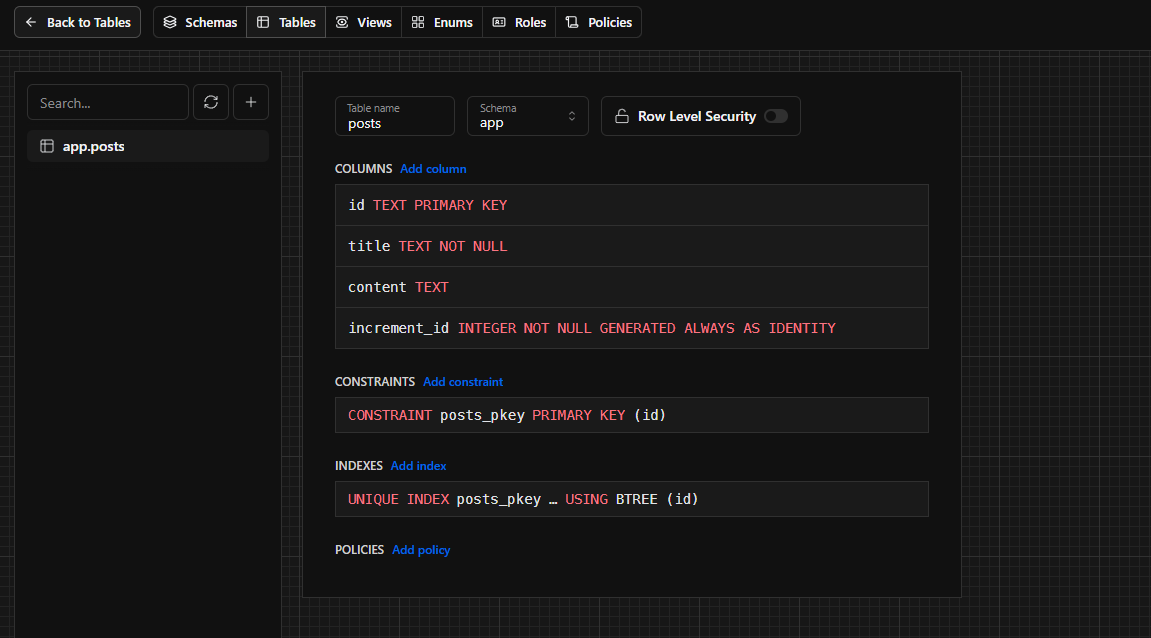
[✓] Changes appliedDrizzle-kit also has a function that allows visualizing the database visually and beautifully, you can run the command bun drizzle-kit studio and you will see an app page like this
Let's try the API again, everything should work fine now
curl http://localhost:4000/post/   --request POST   --header 'Content-Type: application/json'   --data '{
  "title": "test",
  "content": "test"
}'

{"id":"fzrr5jyz98ssatthtutthj7t","title":"test","content":"test","incrementId":1}

curl http://localhost:4000/post/

[{"id":"fzrr5jyz98ssatthtutthj7t","title":"test","content":"test","incrementId":1}]
But, wait, we're not done yet.
Refactoring code
Let's look back at our model file.
import { t } from "elysia";

export const postModel = {
  body: t.Object({
    title: t.String(),
    content: t.String(),
  }),
};
We are defining a body Post model completely by hand and without any basis. Since we have a database schema, why don’t we use that schema as the basis for the Post model?
The drizzle-typebox library can help us do this easily.
// Model file
import { table } from "@/db/schema";
import {
  createInsertSchema,
  createSelectSchema,
  createUpdateSchema,
} from "drizzle-typebox";
import { t } from "elysia";

const _createPost = createInsertSchema(table.posts);
const _updatePost = createUpdateSchema(table.posts);
const _entityPost = createSelectSchema(table.posts);

export const postModel = {
  create: t.Omit(_createPost, ["id", "incrementId"]),
  update: t.Omit(_updatePost, ["id", "incrementId"]),
  entity: _entityPost,
};

// Service file
// ...
  static async updatePost(
    id: string,
    {
      data,
    }: {
      data: typeof postModel.update.static;
    }
  ): Promise<typeof postModel.entity.static> {
    const post = await db.query.posts.findFirst({
      where: eq(table.posts.id, id),
    });
    if (!post) {
      throw new Error("Post not found");
    }
    const posts = await db
      .update(table.posts)
      .set({
        title: data.title,
        content: data.content,
      })
      .where(eq(table.posts.id, id))
      .returning();
    return posts[0];
  }
// ...

// Controller file
// ...
const updatePost = new Elysia({ name: "update-post" }).put(
  "/:id",
  async ({ params, body }) => {
    return {
      data: await PostService.updatePost(params.id, body),
    };
  },
  {
    response: t.Object({
      data: postModel.entity,
    }),
    body: t.Object({
      data: postModel.update,
    }),
    params: t.Object({
      id: postModel.entity.id,
    }),
  }
);
// ...
By editing the model file, reusing the database schema in Elysia validation models and some small changes in the service, controller files. We have got clearer, more declarative and ergonomic code.
However, using t.Omit and t.Pick will become increasingly complicated if we apply it to large models and repeat this process. So let's use this utility
import { Kind, type TObject } from "@sinclair/typebox";
import {
  createInsertSchema,
  createSelectSchema,
  BuildSchema,
  createUpdateSchema,
} from "drizzle-typebox";

import type { Table } from "drizzle-orm";

type Spread<
  T extends TObject | Table,
  Mode extends "select" | "insert" | "update" | undefined
> = T extends TObject<infer Fields>
  ? {
      [K in keyof Fields]: Fields[K];
    }
  : T extends Table
  ? Mode extends "select"
    ? BuildSchema<"select", T["_"]["columns"], undefined>["properties"]
    : Mode extends "insert"
    ? BuildSchema<"insert", T["_"]["columns"], undefined>["properties"]
    : Mode extends "update"
    ? BuildSchema<"update", T["_"]["columns"], undefined>["properties"]
    : {}
  : {};

/**
 * Spread a Drizzle schema into a plain object
 */
export const spread = <
  T extends TObject | Table,
  Mode extends "select" | "insert" | "update" | undefined
>(
  schema: T,
  mode?: Mode
): Spread<T, Mode> => {
  const newSchema: Record<string, unknown> = {};
  let table;

  switch (mode) {
    case "insert":
    case "update":
    case "select":
      if (Kind in schema) {
        table = schema;
        break;
      }

      table =
        mode === "insert"
          ? createInsertSchema(schema)
          : mode === "update"
          ? createUpdateSchema(schema)
          : createSelectSchema(schema);

      break;

    default:
      if (!(Kind in schema)) throw new Error("Expect a schema");
      table = schema;
  }

  for (const key of Object.keys(table.properties))
    newSchema[key] = table.properties[key];

  return newSchema as any;
};

/**
 * Spread a Drizzle Table into a plain object
 *
 * If `mode` is 'insert', the schema will be refined for insert
 * If `mode` is 'select', the schema will be refined for select
 * If `mode` is undefined, the schema will be spread as is, models will need to be refined manually
 */
export const spreads = <
  T extends Record<string, TObject | Table>,
  Mode extends "select" | "insert" | "update" | undefined
>(
  models: T,
  mode?: Mode
): {
  [K in keyof T]: Spread<T[K], Mode>;
} => {
  const newSchema: Record<string, unknown> = {};
  const keys = Object.keys(models);

  for (const key of keys) newSchema[key] = spread(models[key], mode);

  return newSchema as any;
};
Then, create a singleton database model like this
import { table } from "./schema";
import { spreads } from "./util";

export const dbModel = {
  insert: spreads(
    {
      post: table.posts,
    },
    "insert"
  ),
  update: spreads(
    {
      post: table.posts,
    },
    "update"
  ),
  select: spreads(
    {
      post: table.posts,
    },
    "select"
  ),
} as const;
Then edit the model file as follows
import { dbModel } from "@/db/model";
import { t } from "elysia";
const { post: insertPost } = dbModel.insert;
const { post: updatePost } = dbModel.update;
const { post: selectPost } = dbModel.select;

export const postModel = {
  create: t.Object({
    title: insertPost.title,
    content: insertPost.content,
  }),
  update: t.Object({
    title: updatePost.title,
    content: updatePost.content,
  }),
  entity: t.Object({
    ...selectPost,
    incrementId: t.Number(),
  }),
};Summary
If you follow the instructions in this article closely, you will end up with code like this repo.
This article has guided you how to connect Elysia application and database easily and effectively, with full notes and practical experience, I hope it is useful for you.
If you have any questions, do not hesitate to comment below.
In the next article, we will implement authentication for the application.
